Archive
TFS Shared Resources in Mesh
I was lucky enough to get an early invite to Live Mesh (I was working at Microsoft at the time). Back then it seemed more like a concept than an implementation there were that many flaws. I tried it for a while, but fell back to folder share and other technologies. Mesh got uninstalled.
To be honest, I hadn’t looked at Mesh since that time. Until today.
It all started as the result of a TFS engagement I had just finished consulting on down at the Gold Coast. I decided to build a TFS Resource Pack for all the common files you typically need on a TFS engagement. For example, VSTS SP1, TFS 08 SP1, SQL Server 2005 SP1, TFS sync tool, TFS migration tool, Branching Guidance document, TF Power Tools, Team System Web Access SP1, the list goes on!
Usually I just download these tools on site at the client but I figured it would be easier to have a portable HDD with all these items (I don’t own such a HDD but was willing to buy one). I ran the list of items in my pack past some internal Readify guys and one of the responses was: ‘Why not mesh?’
Why not indeed! There’s 5Gb worth of space in the cloud that I can use so why not put all these resources in one place where I can always get them? Maybe not the 1Gb ISO’s for service packs, but certainly the rest can go there.
So as of today, there is a folder in mesh with all this information, and I plan on continuing to add to it over time.
Want access? All you need is a Live Mesh account and send me your email: I’ll invite you to the folder so you can get the files as well (read access only if I don’t know you). And then just email me if you think I should add any particular file or application.
The Right Administrator Permissions in TFS, WSS, and RS
I tend to forget the right permissions to set for TFS 2008 and its various components. And not all the various permissions are readily searchable on the net. So this quick blog entry is just a reminder for myself.
Create Projects in TFS
To create a project in TFS you need the relevant TFS permission ‘Create new projects’ which is defined at the server level. By default, the ‘[SERVER] Team Foundation Administrators’ group has this permission, but being a member of this group is just not enough. When you create a new team project, TFS also creates a new site in Windows Sharepoint Services (WSS), and a new folder in Reporting Services (RS). So it only makes sense that the user should have permissions to be able to perform both those operations as well.
Reporting Services is pretty easy. With your admin account that installed TFS (TFSSetup perhaps?) go to your Reporting Services web folder, typically it is something like this: http://tfsrtm08/Reports. You will be able to see the sub folders for each of your projects, but we need to set permissions at this root level. Click on the ‘Properties’ tab and click ‘New Role Assignment’. Specify your user account (or AD group) and tick all the boxes. Finally click OK and you are done. RS permissions are inherited so the user will get access to all sub folders, now and in the future.
WSS is a bit more interesting. Adding a user to the root site and giving them ‘Full Control’ in fact does nothing. It is not like RS where the permissions are inherited. Full Control on the root site means ONLY the root site, not sub sites, and not the ability to create new sub sites. What you need is the ‘Site Collection Administrators’ permission for the root site instead. Find it by going ‘Site Actions –> Site Settings –> Site Collection Administrators’. Add your user here and they will be able to create sub sites. However it is worth noting that this does not entitle your user to full control over all sites that are created: it will only give them full access to the ones that THEY create. If someone else creates one, this user will NOT have access. We’ll deal with this below.
Full Admin Privileges
One of the things I find is that TFS management (including permissions) falls to the hands of the infrastructure team. And infrastructure guys like to manage permissions through Active Directory. They like to have a ‘TFS Admins’ group in AD and for anyone to have full access, they want to be able to just add them to that group and not have to think about it any further. It makes sense somewhat because this is how a lot of their user maintenance occurs in their day-to-day jobs.
As mentioned earlier, just because you have Site Collection Administrator privileges does not mean you have full control over all sub sites. If you create a new site, you will be given admin access to that site. But if someone else creates one, then you will NOT have access. Site Collection Admin only lets you create sites, nothing more. So normally you have to add users to a site after it is created. But sometimes there is a lead developer or sys admin who should have full access over all WSS sites, regardless of who created them. This permission is a little harder to find.
To fix this, you need to access WSS Central Administration, which is typically something like http://tfsrtm08:17012/. You will need to do this with your TFSSetup account (or equivalent) since it will be the only account out of the box that has WSS Central Admin privileges. Go to: ‘Application Management –> Policy for Web Application’ and click ‘Add Users’. On the first screen, ensure Zones is set to ‘All Zones’ and click Next. Then under ‘Choose Users’ add your user account to the box and click the little ‘tick’ icon below to ‘check names’. Check the box for ‘Full Control’ and click ‘Finish’.
This gives your user full access over the whole application, which means all future sub sites that may get created.
Summary
I’m not really sure what best practice is, but from my experience it is often best that only the TFSSetup account has master access to everything. Creating a new team project is not something that should happen every day. It represents something big, a new era of development. Its something that will have a lifecycle, iterations, management and buy-in from stakeholders inside and outside your development team. It makes sense that there should be one person responsible for the project and relevant RS and WSS site. This should be the person who gives out additional privileges for developers and managers to those additional components.
Still, the customer is always right. =)
CreateFoldersItem Custom Task for MSBuild
Last year I did a fair amount of MSBuild stuff, and really enjoyed it. And when I recently wrote an MSBuild task to clean up TFS source bindings in Visual Studio solutions and projects, it rekindled my interest and reminded me how much I like MSBuild.
That’s why today I decided to write another task to add to my library. I wanted to be able to get an item group containing folders, in particular the last name token each directory. For example, for the path “C:\Program Files\BitLocker\en-US\” I wanted to get the “en-US”.
I did a quick look to see if there was a way to do it with the existing ‘CreateItem’ task, or if anyone else had tried to do this and had a solution. But to be honest I didn’t look TOO hard because I really wanted to tackle this problem myself!
Enter: Snagy.Tasks.CreateFoldersItem
I’m actually writing this post while I work on the task. Think of it as a step by step account, and I’ll be writing in a present tense, so forgive me if it sounds daft. But if you’ve never created a custom task for MSBuild before, I’ll cover off all the basics.
First, I created a class library project in C# (actually I already had one from the last task I wrote, so I am just adding to that). Up front you’ll want to add some assemblies to your references list:
Microsoft.Build.Utilities
Microsoft.Build.Framework
Next, add a new class, call it ‘CreateFoldersItem’. At the top, add using statements for the 2 above namespaces, and add a using statement for System.IO while you are at it. Now, make your class inherit from ‘Task’ which is in the Microsoft.Build.Utilities namespace. You can also choose to implement ITask instead, but then you need to provide a little more information in your class. Its easier just to inherit from Task instead. One final thing you need to do to make it build is override the ‘Execute’ method. Do this now but don’t provide any implementation yet other than to ‘return true’. Build your task to make sure its all hunky dory.
Next we want to provide attributes on our task that people can use to set information to be used by the task. I was thinking of a syntax something like this:
<CreateFoldersItem Include=”C:\Projects;C:\Program Files”
Exclude=”C:\Projects\MSBuild\;C:\Projects\Lisp”
Recursive=”true”>
<Output ItemName=”AllFolders” TaskParameter=”Include” />
</CreateFoldersItem>
This would take semi-colon delimited folders as input and provide a single ItemGroup of all sub-folders. If Recursive is false, only look 1 level deep, otherwise hit the bottom. The Exclude is a little tricky but I think just a semi-colon delimited list of folder names will suffice. Also I’ve deliberately used a semi-colon delimited list for Include and Exclude so that we can use ItemGroups as inputs in both those cases. That way you could use this task to create an include list and an exclude list, and then create a third list which is a delta of the two.
Ok so back to our class. We need to define 3 properties here. For my task, only the ‘Include’ attribute is mandatory. Exclude will be empty by default, and Recursive will be false by default. We can easily create the properties with C#3.0 syntax:
[Required] [Output] public ITaskItem[] Include { get; set; }
public bool Recursive { get; set; }
public ITaskItem[] Exclude { get; set; }
The ‘Required’ attribute means the Task cannot be called without mention of that property. And the ‘Output’ attribute means that the property can be used in the ‘TaskParameter’ attribute of the <Output> element. The ITaskItem interface stores individual items for passing around. It is best practise to use an array of these for accepting and returning ItemGroups.
Now we need to focus on our core functionality. We need to iterate through each Include item and add each sub-folder to a list. Since each include item might be a child or parent of another include item, we need to think about duplication. Until now I hadn’t thought if I want my returned ItemGroup to include duplicates. This could easily be configurable for the user by adding a ‘bool Distinct’ property but I’ll just assume that we don’t want duplicates to make it easy.
One of the things I want to be able to do is get some metadata out of my returned folders, specifically the last location in the folder path token (the ‘en-us’ in the example earlier). I’ll call this the folder ‘Name’ (since this is the convention used by the DirecoryInfo class in System.IO). This lets us get just the folder name using metadata like this:
<Message Text=”Folder name = %(AllFolders.Name)” />
Let’s start by creating a simple method that takes the string path of a folder and returns an ITaskItem which includes the above described metadata:
private TaskItem CreateTaskItemFromFolder(string folder)
{
DirectoryInfo di = new DirectoryInfo(folder);
Hashtable metadata = new Hashtable();
metadata.Add("Name", di.Name);
return new TaskItem(folder, metadata);
}
So what’s happening here? Well we use the DirectoryInfo class to provide us the last token in the directory path, via the ‘Name’ property (ie. di.Name). Metadata needs to be added via a non-generic implementation of IDictionary, in this case I used a System.Collections.Hashtable. The best implementation of an ITaskItem is the TaskItem class (surprised?) and its constructor lets us provide the folder path and the metadata as parameters.
Now we can use this method to create a TaskItem for each folder that we find. We need a method that will accept a base folder as a parameter, and return a List of TaskItems based on all child folders (with consideration to the ‘Recursive’ option). Here’s a method that does just that:
public IList<TaskItem> GetChildFolders(string folder, bool recursive)
{
SearchOption searchOption = (recursive ?
SearchOption.AllDirectories :
SearchOption.TopDirectoryOnly);
string[] subfolders = Directory.GetDirectories(folder, "*", searchOption);
IEnumerable<TaskItem> children =
subfolders.Select(s => CreateTaskItemFromFolder(s));
return children.ToList();
}
We utilise the existing ‘GetDirectories’ static method of the System.IO.Directory class. This method has an overload that accepts the ‘SearchOption’ enum which pretty much means recursive or not. Note that when specifying SearchOption.AllDirectories, the search will recursively search your whole tree from that point, even following folder shortcuts. This means if you have a shortcut to a higher level folder, you could potentially get stuck in an infinite loop. So be careful: if this task is called with Recursive=true, then ensure its not called on a folder that nests to itself via shortcuts.
Finally with a little bit of lambda magic, we create a task item from each folder returned by GetDirectories. That’s all the hard work done, we just need to bring it together in our Execute method and overwrite the ‘Include’ folder with the new results. Here’s what the first bit of code in our Execute method looks like:
IList<TaskItem> results = new List<TaskItem>();
foreach (ITaskItem item in Include)
{
IList<TaskItem> children = GetChildFolders(item.ItemSpec, Recursive);
results = results.Union(children).ToList();
}
Essentially the above code just creates one big list of task items by unioning the result of each folder call. After the loop completes we have all the included subfolders in one list. We now need to remove any exclude folders from that list. The next bit of code looks like this:
foreach (ITaskItem item in Exclude)
{
results = results.Where(x => x.ItemSpec.ToLower() != item.ItemSpec.ToLower()).ToList();
}
This code is not as difficult as it looks. Once again we use a lambda to specify a condition on which we want to filter results. That condition is based on matching the folder strings from the exclude list against those in the current results list. The output is a new list without the matching items, and we just overwrite Results with this new list.
The last piece of the puzzle is to push our output back into the Include list of task items:
var r = results.Cast<ITaskItem>();
Include = r.ToArray();
Simply put, we need to cast our list of TaskItem to a list of ITaskItem and then push it out as an array.
And that’s it! A couple things to mention though. In the final version of my code there are lots of checks around whether folders exist. Its also worth mentioning that instead of using .Select and .Where methods, you can use standard LINQ syntax instead. I just found the lambda syntax more concise and easier to read.
So what’s the final result? Well you can do funky things like this:
<CreateFoldersItem Include="C:\Projects\Secret"
Recursive="true"
Exclude="C:\Projects\Secret\NotReallySecret">
<Output ItemName="SecretFolders" TaskParameter="Include" />
</CreateFoldersItem>
<CreateFoldersItem Include="C:\Projects"
Recursive="true"
Exclude="@(SecretFolders)">
<Output ItemName="AllFolders" TaskParameter="Include" />
</CreateFoldersItem>
In the above example, we get an item group for all folders under C:\Projects except for all the secret projects. Note that AllFolders will include C:\Projects\Secret\NotReallySecret\ because it was excluded from the first list!
I hope you find this task useful. You can download the DLL and example usage here.
Remove Source Control Bindings – Visual Studio 2008
Ever find yourself giving code to someone else? Maybe its an official handover of the source, or perhaps an example to post on your blog. Well, if you keep your solution in Team Foundation Server and it is bound to source control, then the solution will contain information about its TFS bindings. If you’ve ever attempted to open a solution with such bindings, but are unable to contact TFS, you get a series of popups indicating that TFS couldn’t be found, would you like to work offline, etc. This is certainly not something you want other people to have to put up with when you give them your solutions, its just bad form!
It is quite easy to remove these bindings in Visual Studio. You can unbind via ‘File -> Source Control -> Change Source Control’ and this works just fine. Your solution and project files will have the relevant source control sections removed, and the extra files (.vssscc and .vspscc) will be deleted.
But what if you want to automate this process?
Unfortunately there are not a lot of options around. Deleting the files is pretty easy; create an item group for the two extensions above, and call the delete task on them. But what about modifying solution and project files? This has prompted people to come up with their own solutions, one such as from John Robbins who created an MSBuild task for removing these bindings. Unfortunately John’s task did not work for me and I presume this is because he targets Visual Studio 2005, not 2008 (the article was written in 2006). This gave me the fuel to come up with my own solution instead.
The above download will give you the DLL and an example MSBuild file to use. There are essentially 2 tasks that do two separate things.
RemoveTFSBindings
This task removes bindings from SLN and CSPROJ files. I have no immediate plans to add support for VBPROJ or DBPROJ but if you really want these included, I am happy to do so. Just email me.
This task is called like this:
<RemoveTFSBindings SourceFile="Src.sln" TargetFile="New.sln" />
Yes, it only processes one file at a time, however it is quite easy to call it with an item group as follows:
<ItemGroup><ProjectFiles Include="$(path)\**\*.sln;$(path)\**\*.csproj" /> </ItemGroup>
<Target …>
<RemoveTFSBindings SourceFile="%(ProjectFiles.Identity)" ReplaceTarget="true" />
</Target>
The above example will replace each file with a version of the file without source bindings.
RemoveSCCBindingFiles
This task removes all dedicated source control files in a given folder, with the option of repeating the process recursively. It is called like this:
<RemoveSCCBindingFiles Folder="$(path)" Recursive="true" />
It targets and deletes all .vssscc and .vspscc files.
Usage
Not sure how to use a custom task? All you need to do is import each task with the ‘UsingTask’ task, like this:
<UsingTask TaskName="Snagy.Tasks.RemoveTFSBindings" AssemblyFile=".\Snagy.Tasks.dll" />
<UsingTask TaskName="Snagy.Tasks.RemoveSCCBindingFiles" AssemblyFile=".\Snagy.Tasks.dll" />
Disclaimer
I’ve tested the tasks on a variety of projects created by different people and it seems to work fine. That being said, I’m standing by the "It works on my machine" motto. I can’t guarantee it will work for you. Please note that my tests have been specifically around TFS and doubt that this will work for any other source control binding.
Also, I included an EXE version as well just in case you wanted a different avenue of usage. I only did this though because Paul Stovell begged and pleaded for it. Its included in the download link above.
Good luck!
TFS: After a rename, I can’t get a specific changeset!
This post deals with the intricacies of Source Control in Team Foundation Server. A common operation is to do a ‘Rename’, particularly on a folder. So how does this affect the changesets for all files in that folder?
MoneyMaker
For this post, assume I have a product called ‘MoneyMaker’ in my TFS Project:

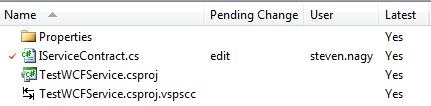
We are halfway through release 1.2.7 however the company has just come up with a new naming standard! We decide to check-in our last change to the service contract for safety, it was pretty much done anyway. It becomes changeset: 10081.

Ok so now we have to perform a rename of the folder to match our new versioning strategy. The company wants to use letters instead of numbers for its convention. So the new version will be: A.B.G.


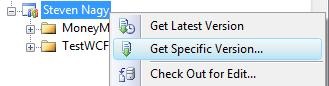
Ok so the rename was a success. Even the local folder has been updated. But I just realised I made a mistake with my last checking before the rename! I want to get an earlier version of that service contract. So let’s see what happens when I use the “get specific version” option on the file and specify the first changeset 10080.


Well, the ‘get’ seemed to do something, but we now have something funny happening:
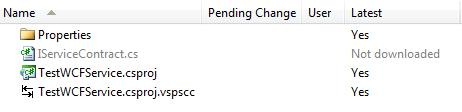
For some reason, the file now has a status of “Not Downloaded”. The file has even disappeared from the local file system:

So what gives? Well believe it or not, this is completely by design. Think for a moment about that changeset 10080, the first changeset for the file. It existed when the folder name still reflected the old versioning strategy (v1.2.7). So that version of the file at that point in time belonged to a v1.2.7 folder, not a A.B.G folder. So Team Explorer did the right thing: it deleted the current copy, then went to download any relevant files for that folder (A.B.G), of which there were none. So what happens when we try to get that changeset from a level higher than renamed folder?

Well the ‘get’ happens as usual, but takes a little longer since it now has more files to process. But something interesting has now happened: the folder name has reverted back to the original! And the local file system reflects the same information:


Now you can get to the old versions of your files prior to the rename. But this is still a bit of a pain so be mindful of your renames. Have a think about the checkboxes in the ‘get specific version’ dialog to ensure that your ‘get’ doesn’t take all day.
Object Finalization : IDisposable, Dispose(), Destructors and Garbage Collection
I apologise for the long title, but I wanted to be clear about what this post will cover. I was recently updating some of Readify’s courseware and was looking at our Garbage Collection section; that prompted this post.
Concepts
First lets define 2 concepts: Dispose() method and the Finalizer. In C#, the Finalizer is known as the ‘Destructor’ and is a special method that follows this syntax:
public class MyClass {
public MyClass() { ..constructor logic.. }
~MyClass() { ..destructor logic.. }
}
As you can see, a destructor follows the constructor logic, but has a tilda ~ in front. In VB.Net there is no equivalent, however you can override the Object.Finalize method instead (which incidentally you can’t do in C#). So that is essentially the direct equivalent. Incidentally, because every class inherits from object, your class already has a Finalizer, it just doesn’t do anything until you implement it yourself.
Dispose() is a method that you define. There is an interface called IDisposable which will force you to implement this method. If you don’t define it, your class doesn’t have it.
What Are They Used For
Both the Finalizer and the Dispose() method are used for cleaning up your objects. This might be closing database connections, letting go of a disk file, or closing a stream from your serial port. It also means releasing handles to unmanaged resources such as pointers and COM artefacts.
The Finalizer (destructor) is called when the garbage collector cleans up your object. But garbage collectors are unpredictable: they will clean up your object whenever they feel like it. This is known as ‘non-deterministic finalization’ because we can’t determine when the object will be cleaned up. Also, the destructor is not a proper method so you cannot call it from your code.
The Dispose() method is just that: a method that you can call whenever you like. This makes it ‘deterministic’ in that we can determine when the cleanup will occur: when we call the method. By implementing IDisposable we are also telling other artefacts that we have that special cleanup method and can be called. A good example of that is the “using” statement. Here is an example:
using (StreamReader sr = new StreamReader(“C:\test.txt”)) {
string s = sr.ReadToEnd();
}
In the above example a StreamReader object is created and utilised. The ‘using’ statement ensures that the Dispose() method is called at the closing bracket. In fact, it will do this even if an exception occurs within the ‘using’ scope. However, you can only use this syntax on classes that implement IDisposable.
Which Do I Use
If you have nothing to cleanup (and your sub-classes or base class have nothing to cleanup) then you don’t need to worry about either. However when you have resources to cleanup, then you should really implement both. The reason for this is simple: Provide Dispose() method for deterministic finalization, and provide a destructor in case consumers don’t call the Dispose() method.
And for those of you (like me) who hate to waste white space on duplicate code, you can call the Dispose() method from your finalizer, however it is best to consider some Microsoft recommended best practises when doing so.
Pattern For Finalization
This pattern is based on this article by Joe Duffy. The following example illustrates the pattern best:
private bool isDisposed = false;
public void Dispose()
{
Dispose(true);
GC.SuppressFinalize(this);
}private void Dispose(bool disposing)
{
if (isDisposed) return;
// General cleanup logic here
if (disposing)
{
// Deterministic only cleanup
}
else
{
// Finalizer only cleanup
}
isDisposed = true;
}~MyClass()
{
Dispose(false);
}
As you can see, there is a bool switch to determine if the Dispose logic applies to finalization or not. This pattern has some advantages when it comes to inheritance. For example, overriding the Dispose(bool disposing) method in a sub-class lets you customise how finalization will occur, without needing to provide the destructor or Dispose() methods (since via inheritance your class already has those methods and implements IDisposable). Also, we track if the object has already been disposed so that we don’t do it again. Finally, the call to GC.SuppressFinalze(this) means that since the object has been properly disposed, there is no need to call the destructor (ie. suppress finalization of this object). Make sure that call goes after the call to Dispose(true) : this ensures that if the Dispose method fails (raises exception) that the destructor will still execute again later and reattempt to cleanup the object.
Nappy Poo Fear!
I mean, Happy New Year!
I know I haven’t posted in a while, but there’s good reasons. Those who know me know that we had a new arrival just before Christmas, a beautiful baby girl, Isabella Maria Nagy. Click here for photos.
Chumby
So enough with the personal stuff, lets talk about what I got for my birthday (just before christmas). Recently, Chumby was released in Australia. I really liked the concept and since it was the only thing I put on my birthday wish list, it was no surprise that I got one for my 31st.
Chumby is a little touch screen device that shows widgets. What it shows is completely up to you. It connects to your wireless internet and downloads news, weather, time, games, music, video, and more. It can be used as an alarm clock (has a ‘night mode’) so you can wake up to your favourite internet music channel. You can use it to monitor your twitter updates, eBay auctions, mail inbox, basically anything that has a widget written for it, which is almost everything.
Under the hood each widget is a Flash application. You can write your own widgets and upload them to the Chumby site for everyone to share. I was thinking of creating a TFS Build Notification tool for it. Hardly something useful on an alarm clock right? Well Chumby doesn’t have to be just an alarm clock. Think of it as a feed of information available anywhere in your house or office. My Chumby sits on my work desk currently, but I am thinking of getting another one for the kitchen and maybe lounge room as well!
The management of your widgets is extremely easy. You don’t need to install anything on your local computer. Once you register your Chumby with the online servers, you can control it via their web interface. By default there is one channel with about 8 widgets pre-loaded, but you can then add/remove widgets as pleases you. If you want, add another channel and add widgets to that channel. For example, you might have one channel for monitoring weather and news widgets only, but in the evenings change to the channel that has all your music and videos, latest clips from YouTube, and Facebook status updates.
Checkout the website for more information about Chumby.
Azure Blog – Above The Cloud
Near the end of last year we saw the release of the Azure Services Platform, a Cloud offering from Microsoft. I’m very intrigued by this and it seems Microsoft have invested a lot of effort into their Cloud architecture.
Rather than spend any real time talking about it here, I’d like to take the opportunity to announce a new blog that I will run beside this one (both will continue). I am dedicating a whole blog to learning about Azure, since I believe it will honestly impact .Net development going into the future.
Check it out at its location here: http://azure.snagy.name/blog and subscribe damn you!
